What exactly is a repair upgrade, though? It is simply a way to perform a fresh install of Windows 10 without deleting your apps, files, and settings. In this article, we take a quick run through the process of performing a repair upgrade.
Perform a Repair Upgrade Using your Windows 10 Install Disc
What are the benefits of a Repair Upgrade?
Apart from preserving your personal files, apps, and settings, a repair upgrade can repair stubborn problems such as a corrupt Windows Installer service, Windows Update issues, registry entries, and corrupt system files. Before you perform a repair upgrade, make sure you have reinstall media that corresponds with the edition of Windows 10 you have installed. So, if you are running the Windows 10 Anniversary Update or the Creators Update, make sure you have that version, along with the edition and architecture (Home, Pro, 32-bit, 64 bit). To find that information, press Windows key + X, click System, then review your system details. If your system came preinstalled with Windows 10 Home or Pro, you could follow the instructions to download Windows 10 and use that to perform the repair upgrade. Check out our guide for instructions on how to download and create bootable media.
Start the Process
You don’t necessarily have to create a bootable copy—the ISO itself will be sufficient. Just double-click the file to mount the ISO or right-click on it, choose Open with, and File Explorer. Once your install media is ready, you should be prompted to start the installation.
Go through the installation wizard as you normally would when installing a new feature update.
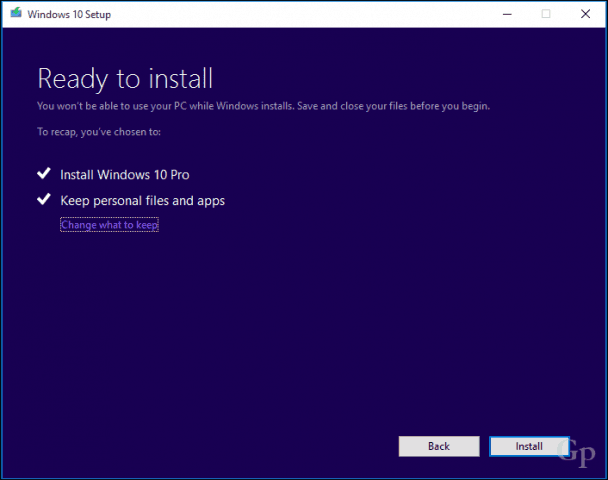
Remember to choose the option: Keep personal files and apps.
When you are ready, click Install to begin.
This will be your screen for a little while. After the installation is complete, you will be asked to sign in and finish up the install.
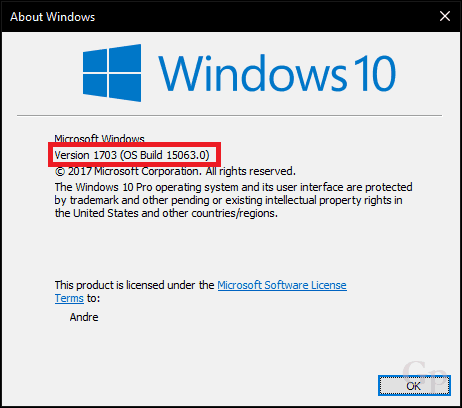
One thing you will notice is your Windows 10 installation will be reset back to its original release. So, for example, instead of having the latest cumulative update installed, you will see something like 15063.0 installed. If you were connected to the Internet during installation, Windows 10 setup might intelligently download and install those updates before reaching the desktop. If not, you can follow our guide to download the latest cumulative update to get your system current.
Summing Up
As a precaution, you should follow some of our pre-requisite tasks, such as disabling security utilities, disconnecting non-essential peripherals, before starting the upgrade. This can reduce the chances of conflicts occurring during the upgrade. That’s pretty much all there is to a repair upgrade. Not only do you get to perform a fresh install, but you preserve your files and apps and repair any damaged system files or services while doing it. Have you ever performed a repair upgrade? If so, let us know how it went in the comments. Regardless, it has been a life saver when all else has failed, yet I still subscribe to keeping a system image just in case. https://appuals.com/reset-microsoft-edge-on-windows-10/ Good luck. this is another problem with early installers of win 10 with exceptionally slow running computer being the immediate problem can this be fixed without losing apps and files regards Once you have it saved to the desktop, double click on it and choose Upgrade. It will then ask you if you want to keep your apps and personal files. Click “Yes” and the rest will be done for you – mind you this will take some time. All you are doing is upgrading over an upgrade, so when all is finished you will find a Windows.old folder in your “C” directory. Do not delete this – Microsoft will delete it after 10 days or so for you. Note that this folder will be largish but when you are happy that all is good you can also delete it with Microsoft’s native Clean Manager. I’d just wait and let Microsoft do it for you! You should find that all is good but if there are any troublesome programs uninstall them and then re-install back with your installer disk if you have them. If this upgrade over an upgrade fails, then you are looking at a “Clean Install” of Windows 10 where, unfortunately, you will lose all your apps and personal files! But there is a way of copying these files to another storage drive, and then simply copying them back. Keep in mind that apps will not work, but personal files such as documents and pictures and videos will – as long as you have made a copy of them! Good luck… Also, when I perform the clean install I assume I will have to re-install all of the updates. Or, can I go directly to the latest Creator’s update. Does it include all updates since Win-10 was released? The only thing that got edge back was to create a new user account and move over all my files. More time consuming (but a better option for me) was to do an upgrade over an upgrade as mentioned in my earlier comment to Tony. Then again, there’s the option to use a different browser and not use edge at all. Good luck in your endeavours… I came across the following which will disable it but not reinstall or fix it. Other than that I would just hide it from sight and not worry yourself about it because Chrome and Firefox are more than adequate for everyday browsing. Seeing that you are playing around with one of your spare computers, here’s how to disable it. Hope it works for you… In C:\Windows\SystemApps rename the Edge folder to NOT_Microsoft.MicrosoftEdge_8wekyb3d8bbwe. Compare that to the 10 – 20 seconds it would take before the creators update, and log in slowdowns being nowhere near as bad as they are now on the very same computer, you can see my frustration here. Even as I’m typing this, I’m seeing yet another problem I’m having that didn’t start until I got the creators update: Lag when I’m trying to type. Again, this only started after the creators update. It used to be so buttery smooth. Now, not so much. Comment Name * Email *
Δ Save my name and email and send me emails as new comments are made to this post.


![]()
